Quick Start Guide
Get TweetPilot up and running in under 5 minutes. Follow these steps in order.
TweetPilot.dmg, drag TweetPilot to your Applications folder, then launch it (macOS 12 Monterey or later). Windows: run TweetPilot.msi and follow the setup wizard (Windows 10 or later, x64).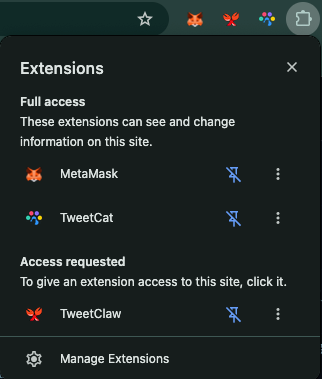
20086). Confirm both are displayed correctly."Search for the 5 most recent tweets mentioning 'AI automation' and show me the usernames and like counts."
The agent will write and run the script automatically, then display the results in the chat.
AI Agent
TweetPilot ships three purpose-built AI agents, each optimized for a different role. All agents run locally on your Mac using your own AI provider — nothing is routed through TweetPilot servers.
Built on Claurst
An open-source agentic coding engine, originally a clean-room reimplementation of Claude Code's core behavior. TweetPilot embeds Claurst as its agent runtime and injects Twitter-specific tooling on top.
Four Specialized Agents
product.md for product context and content_rules.md for tone and content constraints — every response stays on-brand.content_rules.md to enforce brand tone, religious constraints, or keyword blocklists across every run. Supports two permission modes: Workspace Full Access (recommended) limits file ops to the workspace; Full Access removes all restrictions. Full session logs are saved for every run.custom_blocks.db (mandatory purpose comment in every CREATE TABLE), generate data write scripts, produce self-contained display HTML in the cards/ folder. All chart libraries are inlined — no external CDN.Supported Provider Types
All four agents use the same active AI provider. Configure multiple providers and switch the active one at any time — the switch takes effect immediately across all agents.
| Type | Built-in Examples | API Key | Base URL |
|---|---|---|---|
| Anthropic | claude-sonnet-4-5, claude-opus-4-5… | Required | https://api.anthropic.com |
| OpenAI | gpt-4o, gpt-4-turbo… | Required | https://api.openai.com |
| OpenAI Compatible | DeepSeek, Groq, and others | Required | Provider's endpoint |
| Ollama | llama3, qwen2.5, mistral… | Not needed | http://localhost:11434 |
| Custom | Any OpenAI-compatible endpoint | Optional | Your custom URL |
Setup Steps
claude-sonnet-4-5), and optionally set a Base URL. Built-in provider types are locked and cannot be changed after creation.Using Ollama (Local Models)
ollama pull llama3 (or any other model), then add Ollama as a provider in TweetPilot. The default base URL is http://localhost:11434 and no API key is needed.OpenAI-Compatible Providers (DeepSeek, Groq, etc.)
Note: DeepSeek offers two API interface modes — OpenAI-compatible and Anthropic-compatible. The base URL and model identifiers differ between the two modes. Visit the DeepSeek API Docs to find the correct endpoint URL and model names for each mode.
Tool Plaza & Automation Plugins
Tool Plaza is TweetPilot's modular plugin center for ready-to-run automation tools and custom workflows. Manage official built-in tools like Post Butler, Immediate Publish, and Multi-Platform Sync, or create your own AI Prompt Plugins.
Core Modules in Tool Plaza
1. Post Butler (发布管家 & 评论自动回复) Setup Guide
2. Immediate Publish (立即发布) Guide
3. Multi-Platform Content Sync (文章跨平台同步) Guide
4. Creating Custom Prompt Tools (自定义 Prompt 插件)
{{topic}}, {{style}}, {{count}}.Pro Tips for Tool Plaza
LocalBridge & TweetClaw
TweetPilot provides two independent ways to reach Twitter/X — LocalBridge (browser session via TweetClaw) and X API (official OAuth). LocalBridge is a local HTTP + WebSocket server compiled into TweetPilot, exposing a REST API at 127.0.0.1:20088. TweetClaw is the Chrome extension that connects your live browser session to LocalBridge, giving scripts and AI agents free, rate-limit-free access to Twitter's full web API.
Two Routes to Twitter/X
:20088) → WebSocket (:20086) → TweetClaw extension → Twitter's internal web API via live browser session.Pros: zero cost, no rate limits, no OAuth setup, full GraphQL responses including likes, retweets, screen_name.
Requires: Chrome open and logged in to x.com.
POST /api/v1/x/oauth/access-token) → Twitter's official API v2 using stored OAuth 2.0 access token.Pros: no browser required, supports Direct Messages (DMs), official API compliance.
Requires: Twitter developer plan ($100/month+), strict rate limits apply.
How It Works
TweetClaw's architecture has three layers working together. LocalBridge (compiled into TweetPilot as a static library) runs a local WebSocket server and REST API. TweetClaw connects to that WebSocket from inside Chrome and injects a content script into the x.com page. When TweetPilot issues a task — search, post, like, follow — it goes through the REST API → WebSocket → TweetClaw content script → Twitter's own web API, using the full authenticated page session.
:20088
:20086
x.com
Why TweetClaw — Two Core Advantages
| Feature | TweetClaw | X API (Direct) | AI Browser Operator |
|---|---|---|---|
| Cost | Free | $100+/month | Free |
| AI Token Usage | Low (structured JSON) | Low (structured JSON) | Very High (screenshot parsing) |
| Data Accuracy | Exact | Exact | Unreliable (OCR errors) |
| Rate Limits | None | Strict | None |
| Setup Required | Extension install only | Developer Portal + OAuth | Complex configuration |
Setup (if you haven't already)
Full installation walkthrough is covered in Quick Start → Step 2. In brief:
20086). In TweetPilot, open Settings → LocalBridge and ensure the Browser Extension port matches. Both must be identical.Troubleshooting
LocalBridge REST API Reference
All endpoints are served at http://127.0.0.1:20088 — accessible only from the local machine. Scripts use requests (Python) or any HTTP client. No authentication header is needed.
| Endpoint | Description |
|---|---|
GET /api/v1/x/search?query=&count= |
Search tweets by keyword or hashtag. Returns full GraphQL response including favorite_count, retweet_count, full_text, screen_name. Parse path: data.data.search_by_raw_query.search_timeline.timeline.instructions[].entries[] |
POST /api/v1/x/retweetsbody: {"tweetId": "…"} |
Retweet a tweet by its ID. Uses the browser session's active account. No OAuth token required. |
POST /api/v1/x/likesbody: {"tweetId": "…"} |
Like a tweet by its ID. |
POST /api/v1/x/tweetsbody: {"text": "…"} |
Post a new tweet. Optionally include "reply": {"in_reply_to_tweet_id": "…"} to reply. |
GET /api/v1/x/tweets?tweetId= |
Fetch a single tweet's full data. Returns likes, retweets, reply count, full text, author info. |
POST /api/v1/x/followsbody: {"userId": "…"} |
Follow a user by their numeric user ID. |
POST /api/v1/x/bookmarksbody: {"tweetId": "…"} |
Bookmark a tweet. |
POST /api/v1/x/oauth/access-tokenbody: {"twitter_id": "…"} |
Retrieve the stored OAuth 2.0 access token for an authorized account (X API route). Required by xdk SDK scripts. |
POST /api/v1/feishu/sendbody: {"text": "…"} |
Send a text message to your configured Feishu private conversation. Returns {"ok": true} on success. |
Calling LocalBridge from a Python Script
There are two ways to call LocalBridge from Python: using the ClawBot SDK (higher-level wrapper) or raw HTTP REST (requests library, no extra install). Both are shown below.
from clawbot import ClawBotClient
import time

client = ClawBotClient()
instances = client.x.status.get_instances()
instance_id = instances[0].get("instanceId") if instances else None

# Search #AI, sort by likes, retweet top result
raw = client.x.tweets.transport.search_raw(query="#AI", count=20, instance_id=instance_id)
instructions = (raw.get("data",{}).get("data",{})
    .get("search_by_raw_query",{}).get("search_timeline",{})
    .get("timeline",{}).get("instructions",[]))
tweets = []
for instr in instructions:
    for entry in instr.get("entries", []):
        r = entry.get("content",{}).get("itemContent",{}).get("tweet_results",{}).get("result",{})
        if not r: continue
        t = r.get("tweet") or r
        rid = t.get("rest_id") or r.get("rest_id")
        likes = t.get("legacy",{}).get("favorite_count", 0)
        if rid: tweets.append({"id": rid, "likes": likes})

top = sorted(tweets, key=lambda x: x["likes"], reverse=True)[:1]
for t in top:
    client.x.actions.retweet(tweet_id=t["id"], instance_id=instance_id)
    print(f"Retweeted {t['id']} ({t['likes']} likes)")
    time.sleep(3)
import requests, time

BASE = "http://127.0.0.1:20088"

# Search
resp = requests.get(f"{BASE}/api/v1/x/search", params={"query": "#AI", "count": 20})
instructions = (resp.json().get("data",{}).get("data",{})
    .get("search_by_raw_query",{}).get("search_timeline",{})
    .get("timeline",{}).get("instructions",[]))
tweets = []
for instr in instructions:
    for entry in instr.get("entries", []):
        r = entry.get("content",{}).get("itemContent",{}).get("tweet_results",{}).get("result",{})
        if not r: continue
        t = r.get("tweet") or r
        rid = t.get("rest_id") or r.get("rest_id")
        likes = t.get("legacy",{}).get("favorite_count", 0)
        if rid: tweets.append({"id": rid, "likes": likes})

# Retweet top result
top = sorted(tweets, key=lambda x: x["likes"], reverse=True)[:1]
for t in top:
    requests.post(f"{BASE}/api/v1/x/retweets", json={"tweetId": t["id"]})
    print(f"Retweeted {t['id']} ({t['likes']} likes)")
    time.sleep(3)
TweetWithVisibilityResults object. Always use result.get("tweet") or result before accessing legacy or rest_id — this handles both formats transparently.Managing Accounts
TweetPilot supports two fundamentally different account types. Each has its own connection method, API capabilities, and data access model. Understanding the difference helps you choose the right type for each workflow.
Two Account Types
Capability Comparison
| Capability | TweetClaw | X OAuth |
|---|---|---|
| Browser required | Yes (Chrome + x.com) | No |
| Home timeline | ✓ | ✓ |
| Tweet search | ✓ | ✓ |
| Post / Delete tweet | ✓ | ✓ |
| Like / Retweet / Follow / Bookmark | ✓ | ✓ |
| Direct Messages | No | ✓ |
| Media upload | ✓ | ✓ |
| Rate limits | None | Twitter API tier limits apply |
| Cost | Free | Paid developer plan required |
| Ask AI about capabilities | Ask AI — it knows all available APIs | Ask AI — it knows all available APIs |
Managed vs. Unmanaged
After connecting an account, you can choose whether to manage it. This controls whether TweetPilot actively collects data for that account.
Account Status Indicators
| Status | Account Type | Meaning |
|---|---|---|
| online | TweetClaw | Browser is open, TweetClaw is connected, and x.com is active. Ready to execute tasks. |
| instance | TweetClaw | Connected as a background instance. May have limited capabilities depending on page state. |
| online | X OAuth | Token is valid and the account is accessible. Ready for API calls without needing a browser. |
| offline | X OAuth | Token may have expired or been revoked. API calls will fail until re-authorized. |
| reauth required | X OAuth | Token has expired. Go to the account detail page and click Re-authorize to log in again. |
Task Scheduler
TweetPilot's task scheduler combines two dimensions — task type (Python or AI) × execution mode (instant or scheduled) — giving you four ways to automate Twitter workflows, from one-click scripts to fully unattended AI-driven operations running around the clock.
Two Dimensions, Four Combinations
What You Can Build — Real Examples
| Combination | Example Use Case |
|---|---|
| Instant + Python | Run a one-off data export, bulk-like a list of tweets, or trigger a notification — without opening a terminal. |
| Instant + AI | Paste a tweet URL and ask the AI to "write three professional reply options in English." Get results in seconds, no code needed. |
| Scheduled + Python | Every hour, fetch your latest mentions, filter for support questions, and post a structured summary to Feishu — fully unattended. |
| Scheduled + AI | Every 30 minutes, let the AI scan new replies under your product tweet and respond as a warm, friendly customer support agent. Or have the AI answer technical questions in a precise, engineering-team tone on a fixed schedule. |
Creating a Task
.py file, or AI Task to describe the job in natural language. For Python, pick the script file. For AI, type your prompt — be specific about tone, target, and action.rm -rf /, sudo). Full Access — no restrictions at all; use only if you fully trust the prompt.Schedule Types
second minute hour day month weekday. The UI has a visual helper that translates your settings into a human-readable summary (e.g. "9:00 每周一").Cron Expression Reference
0 0 9 * * *        # Every day at 09:00
0 0 */2 * * *      # Every 2 hours
0 30 8 * * 1-5     # Weekdays at 08:30
0 0 9,21 * * *     # 09:00 and 21:00 daily
0 */30 * * * *     # Every 30 minutes
0 0 9 1 * *        # 1st of every month at 09:00
Managing Tasks
| Action | Description |
|---|---|
| Test Run | Triggers a scheduled task immediately without changing its schedule. Useful for verifying a new prompt or script before the next automatic run. |
| Pause Schedule | Suspends automatic execution without deleting the task. The task stays in the list with a "paused" badge and can be resumed at any time. |
| Resume Schedule | Re-activates a paused scheduled task. The next run will be calculated from the current time according to the original schedule. |
| Execution History | Each task keeps a log of past runs with status (success / failure), duration, exit code, stdout/stderr output. For AI tasks, the full session conversation is also stored and viewable. |
| Edit Task | Change the task name, prompt, script, or schedule at any time. Not available while a task is currently running. |
Data Blocks
Data Blocks are visual panels that display account metrics and custom data right inside TweetPilot. There are two kinds: built-in blocks that automatically read your managed account data, and custom blocks that you build yourself — powered by any data source you choose.
Built-in Data Blocks
Built-in blocks are tied to your managed accounts. Use the account switcher at the top of each block to view data for different accounts. Only accounts marked as Managed appear here — the longer TweetPilot runs, the richer the historical data becomes.
| Block | What It Shows | Time Range |
|---|---|---|
| Account Snapshot | The latest values for followers, following count, tweet count, liked count, listed count, and media count — a real-time snapshot of the account's current state. | Latest |
| Follower Growth Trend | A time-series curve of follower count changes over the past N hours, letting you see whether the account is growing, plateauing, or declining. | 24h / 7d / 30d |
| Activity Metrics | Trends in tweet count, liked count, and media count over time — useful for understanding posting frequency and content activity changes. | 24h / 7d / 30d |
| Account Overview | A consolidated multi-metric dashboard showing current values alongside change deltas — all key dimensions at a glance. | 24h / 7d / 30d |
Custom Data Blocks
Custom blocks let you visualize any data you care about — not just Twitter metrics. You define both the data and how it's displayed. Each custom block has a dedicated AI agent that guides you through the full build process.
How Custom Blocks Work
.tweetpilot/custom_blocks.db in your workspace. TweetPilot only reads from this file — nothing is synced to the cloud.custom_blocks.db — a Python script run as a TweetPilot scheduled task, an external tool, or any process that can write SQLite. The AI can generate the write script for you.window.tweetpilot.query(sql) to run SELECT queries against the database and renders results as charts or tables. The AI generates this HTML for you — just describe what you want to see.Creating a Custom Block
custom_blocks.db and generate a Python script (or other program) that writes data into it. You can schedule this script as a TweetPilot task to keep data flowing automatically.cards/ folder in your workspace) that queries the database and renders your data as charts or tables. All chart libraries are inlined — no external CDN dependencies.Example: Write Data with a Scheduled Python Script
import sqlite3, os
from clawbot import ClawBotClient

DB_PATH = os.path.join(os.environ["TWEETPILOT_WORKSPACE"], ".tweetpilot", "custom_blocks.db")

bot = ClawBotClient()
info = bot.x.users.get_basic_info()

conn = sqlite3.connect(DB_PATH)
conn.execute("""
    CREATE TABLE IF NOT EXISTS daily_stats (
        -- 用途:每日账号粉丝/推文数快照,由定时任务写入
        date TEXT PRIMARY KEY,
        followers INTEGER,
        tweets INTEGER
    )
""")
conn.execute(
    "INSERT OR REPLACE INTO daily_stats VALUES (date('now'), ?, ?)",
    (info["followers_count"], info["statuses_count"])
)
conn.commit()
conn.close()
print("✅ Stats written to custom_blocks.db")
window.tweetpilot.query("SELECT date, followers FROM daily_stats ORDER BY date DESC LIMIT 30") and render a trend chart. The AI generates both the script and the HTML for you.custom_blocks.db — sales data, server metrics, WeChat analytics, anything. TweetPilot's custom blocks are a general-purpose local data visualization layer.X API Configuration
The X API route connects to Twitter's official API v2 using OAuth 2.0 — no browser required. Once authorized, TweetPilot stores your access token and scripts retrieve it on demand via POST /api/v1/x/oauth/access-token. This is the second of TweetPilot's two Twitter access routes — complementing LocalBridge with DM support and official API compliance.
LocalBridge vs X API — When to Use Which
| Scenario | Recommended Route | Reason |
|---|---|---|
| Search tweets, like, retweet, post, follow, bookmark | LocalBridge | Free, no rate limits, full GraphQL data (likes, screen_name, etc.) — requires Chrome open |
| Send / read Direct Messages (DMs) | X API | LocalBridge does not support DMs; X API v2 has full DM read/write access |
| Headless server / no browser environment | X API | Token is stored, no Chrome or active browser session needed |
| Official API compliance required | X API | Uses Twitter's published v2 endpoints with proper OAuth 2.0 |
| High-volume automation (100+ actions/day) | LocalBridge | X API free tier has strict caps; LocalBridge has none |
How the Token Flow Works
After you authorize an account (Step 5 below), TweetPilot stores the OAuth 2.0 access token securely. Scripts never handle the token directly — they ask LocalBridge to retrieve it at runtime:
POST /api/v1/x/oauth/access-tokenaccess_token= (User OAuth 2.0) — not bearer_token= (App-only, read-only). Write operations like retweet, post, and DM require a user access token.Setup: Connect an X API Account
http://127.0.0.1:20088/oauth/callback.Calling X API from Python — xdk SDK
The xdk SDK wraps Twitter API v2 calls. Install it once (pip install xdk), then retrieve the access token from LocalBridge and pass it to the client. The pattern is the same across all scripts.
import requests

def get_access_token(twitter_id: str) -> str:
    """Retrieve the stored OAuth 2.0 token for the given account."""
    resp = requests.post(
        "http://127.0.0.1:20088/api/v1/x/oauth/access-token",
        json={"twitter_id": twitter_id},
        timeout=10,
    )
    resp.raise_for_status()
    return resp.json()["access_token"]

# Your numeric Twitter account ID (find it in TweetPilot → Accounts)
TWITTER_ID = "1735224873365225472"
token = get_access_token(TWITTER_ID)
from xdk import Client
import time

# Must use access_token= (User OAuth 2.0), NOT bearer_token= (read-only App token)
client = Client(access_token=token)

# Search recent tweets
tweets = []
for page in client.posts.search_recent(
    query="#AI",
    max_results=20,
    tweet_fields=["public_metrics", "text"],
):
    tweets.extend(page.data or [])
    break  # one page per run

# Sort by like_count, retweet top 3 with >= 100 likes
def likes(t):
    m = t.get("public_metrics") if isinstance(t, dict) else getattr(t, "public_metrics", {})
    return (m or {}).get("like_count", 0)

for t in sorted(tweets, key=likes, reverse=True)[:3]:
    if likes(t) < 100: continue
    tweet_id = t.get("id") if isinstance(t, dict) else t.id
    client.users.repost_post(id=TWITTER_ID, body={"tweet_id": tweet_id})
    print(f"Retweeted {tweet_id} ({likes(t)} likes)")
    time.sleep(3)
# Post a tweet
client.posts.create_tweet(text="Hello from TweetPilot!")

# Fetch your mention timeline (since_id filters to new mentions only)
for page in client.users.get_mentions(id=TWITTER_ID, max_results=20, since_id=last_id):
    for mention in (page.data or []):
        print(mention.get("text") if isinstance(mention, dict) else mention.text)
    break

# Get user info by username
user = client.users.find_user_by_username(username="elonmusk",
    user_fields=["public_metrics", "description"])

# Send a Direct Message
client.dm.create_message(
    participant_id="TARGET_USER_ID",
    text="Hey, just spotted your tweet!"
)
t.get("id") if isinstance(t, dict) else t.id — this pattern is used throughout all S0x example scripts and handles both response formats safely.Feishu / Lark Integration
TweetPilot connects to Feishu via your own bot credentials (App ID + App Secret). Once configured, you get two capabilities: push messages from Python scripts, and a Feishu AI Assistant that lets you control TweetPilot remotely by private message — from your phone, anywhere.
Message Flow
Two Capabilities After Setup
POST http://localhost:20088/api/v1/feishu/send to push a text message to your Feishu private conversation. Works from scheduled tasks for automated reporting.Setup: Create a Feishu App
im:message:send_as_bot and im:message.Push Messages from a Python Script
import requests

resp = requests.post(
    "http://localhost:20088/api/v1/feishu/send",
    json={"text": "📊 Daily report ready — check your workspace!"},
    timeout=10,
)
print(resp.json())  # {"ok": true}
尚未绑定任何飞书 ID — you haven't sent the bot a message yet (Step 6). empty_text — the text field is empty.Feishu AI Assistant
Once connected, the bot is your private AI assistant running entirely on your own Mac. Message it like any Feishu contact — from your phone or desktop. It can draft tweet content, answer TweetPilot questions, read data files in your workspace, and confirm execution of pre-authorized scripts. Replies are always concise. See the AI Agent section for its full capabilities.
Contact Us on Feishu
Scan the QR code below to reach our support team directly on Feishu for real-time help.
Upgrade & Plans
TweetPilot is free to start. Unlock scheduled automation and AI agents with Pro, or reach out for an Enterprise plan with hands-on service. View pricing & purchase →
Which plan is right for you?
Feature Comparison
| Feature | Free | Pro | Enterprise |
|---|---|---|---|
| Core | |||
| Multiple accounts | ✓ | ✓ | ✓ |
| TweetClaw integration | ✓ | ✓ | ✓ |
| X API integration | ✓ | ✓ | ✓ |
| Data Blocks | ✓ | ✓ | ✓ |
| Manual Python scripts | ✓ | ✓ | ✓ |
| Automation & AI | |||
| Scheduled tasks (cron) | ✗ | ✓ | ✓ |
| AI agents (Task / Feishu) | ✗ | ✓ | ✓ |
| Feishu integration | ✗ | ✓ | ✓ |
| License & Service | |||
| Price | $0 | from $30 / mo | Contact us |
| License type | — | Duration (monthly / quarterly / yearly) | Permanent (ENT-...) |
| Devices per account | 1 | 2 | Custom |
| 30-day free trial | ✓ | — | — |
| Onboarding & training | ✗ | Self-serve (docs / video) | ✓ |
| Custom development | ✗ | ✗ | ✓ |
| Service contract | ✗ | ✗ | ✓ |